
Optionfier Knowledge Base
Prefer a walkthrough? The step-by-step guides cover the common setups from start to finish: adding Optionfier to your theme, custom product options, selling options as bundle components, native bundles, Build-a-Box, inventory sync, and offering add-ons on a product. This page is the reference: how the pieces fit together, and the settings that change what your customers and your stock see.
What is Optionfier?
Optionfier lets you add custom product options to your store: text fields, file uploads, color pickers, date selectors, and more. Variants are fine for predefined lists like size and color, but they can't capture a customer's engraving text, a logo file for printing, or a preferred delivery date. Optionfier fills that gap, and it keeps inventory accurate for those options whether they're sold as real bundle components or shown as plain text on the order.
It does two more things beyond options: an inventory sync that deducts stock from linked products when a trigger product is fulfilled, and Build a Box, where customers assemble their own bundle from a pool you define and every item they pick decrements its own stock.
Key Concepts
An option set is the container holding all the custom options for a single product, and each product can have one. It's either Published (live on your storefront) or Draft (hidden while you're still setting things up). Inside it you create options, each one a field the customer interacts with, like "Engraving Text" or "Delivery Date". Inside an option you define its choices: a "Frame Material" dropdown might offer "Oak", "Walnut" and "Maple". Each choice can be linked to a product variant for inventory tracking and can carry its own price.
Not every type has choices. A text field or a file upload is a single input with nothing to pick from.
Inventory sync
An inventory sync shows the customer nothing. It deducts stock from linked variants when the trigger product is fulfilled. The sync is one-directional: fulfilling the trigger draws down the linked variants, never the other way round. Use it for a gift box that always includes the same items, or a kit whose stock has to stay in step across several products.
Build-a-Box
A box powers a build-your-own-bundle experience: you define a pool of products and how many items fit, and customers assemble their own. The box sells through a single box product, and each item the customer picks becomes a real line item with its own inventory. See Build a Box.
Setting Up Optionfier
Adding the Theme Block
Your options won't appear on the storefront until the Optionfier block is in your theme's product page template. You only need to do this once, and the Add Optionfier to your theme guide walks it through step by step.
- In your Shopify admin, go to Online Store > Themes and click Customize on your active theme.
- Navigate to your product page template.
- Click Add block, search for Optionfier, and pick Optionfier: Options. (The Build-a-Box blocks show up in the same results; they're covered under Where the Box Appears.)
- Position the block where you want the options to appear, adjust its styling in the right sidebar if you want to, and click Save.
From then on the block renders the options for any product that has a published option set.
Creating Your First Option Set

- Open Optionfier from your Shopify admin and click New option set.
- Give it a name (this is for your reference; customers won't see it).
- Under Product, click Select to connect a product. Each option set is tied to one product, and a product can only be in one option set at a time. If you pick one that's already in use, Optionfier tells you which option set has it.
- Click Add option and choose an option type.
Add option opens a picker, "What kind of option is this?", with the types grouped into Choice lists, Customer input and Layout & content. Every type that collects a value then gets a second step asking whether it should appear as a bundle item or as text on the order: "How do you want to add choices?" for a choice list, "How should this option appear on the order?" for a single-value type. Layout and content types skip that step, since they collect nothing.

Once your options are configured, toggle the option set to Published and click Save.
Option Types

Selectable Options (Dropdown, Radio, Buttons, Product Grid)
Use these when customers pick from a list you define. There are four displays:
- Dropdown: a compact select menu that expands when clicked. Best when you have many choices and want to save space.
- Radio buttons: every choice visible at once.
- Pill buttons: inline styled buttons, best for a small number of choices.
- Product grid: a wrapping grid of image tiles, one per choice, with the choice's linked variant image above its label. Good for options customers shop visually, like styles or finishes. Choices with no linked image show as caption-only tiles, and the image size you pick (Medium or Large) also sets the grid's column width.
Checkboxes
Checkboxes let customers toggle add-ons on or off, like "Add gift wrapping" or "Include batteries". You can display them as standard checkboxes, as pill button toggles, or as an on/off switch.
Text, Email, Phone and URL
A Text Input is a free-form field for engraving messages, personalization notes or special instructions. Configure it single-line or multi-line, set minimum and maximum character limits, and add validation for a specific format. Three of those formats get their own rows in the picker: Email for a gift recipient's address or a proof-approval contact, Phone for a delivery contact number, and URL for a playlist link or a reference image. Each one is a text field with the matching validation already applied, so bad input gets an inline error and the usual text settings still apply.
Number Input
A numeric field with optional minimum, maximum and step size. You can show it two ways: as a plain Number field, or as a Slider the customer drags, which needs both a minimum and a maximum to have a range to slide along.
Date and Time Pickers
A Date Picker is a calendar for delivery dates, event dates or reservation scheduling. Set minimum and maximum boundaries using fixed or relative dates (like "starting from tomorrow" or "within the next 30 days"), restrict availability by day of week, or block specific dates. A Time Picker takes a time in 12-hour or 24-hour format, with a minute step interval (every 15 minutes, say) and a minimum and maximum.
File Upload
Let customers upload images, PDFs, design files or any document type you specify. Restrict which file types are accepted and set a maximum size. Uploaded files are attached to the order, see Viewing Uploaded Files on Orders. Shopify caps uploads at 20 MB, except video files, which can go up to 1 GB, and any maximum you configure has to stay inside those limits.
Color and Image Swatches
Color swatches are a row of color circles you define yourself: you name each color and give it a hex value, and the customer picks one. Good for a fixed palette, like the four finishes you actually stock. Image swatches are a fixed set of choices too, shown as pictures: fabric patterns, material textures, anything best communicated visually. A color swatch order records the color's name, so it reads "Red" rather than a hex code; turn on Add color value to cart in the option's settings and it records "Red (#FF0000)" instead.
Dynamic color has no predefined choices at all. The customer picks any color from a visual picker or types a hex value, and you get exactly that value on the order. Reach for it when the whole point is that the customer chooses freely, like a custom paint match.
Headings, Paragraphs, Dividers and Spacers
Four presentational types that structure the option form and collect nothing. A Heading holds text you write and picks its size (H2, H3 or H4), a Paragraph holds text, a Divider draws a horizontal rule, and a Spacer adds vertical room (dividers and spacers both come in small, medium and large). Because they carry no answer, none of them reaches the cart or the order, none can be required, and none has an Appears as setting.
Option Settings
Labels
Each option has two labels. Label is the primary identifier: it has to be unique within the option set, and it's what gets written to the cart and the order. Label on product is an optional display name shown on the product page, for when you want something friendlier than the internal one.
Choice Titles
By default, a choice's title on the storefront is whatever you typed for it. Choice titles in the option's settings can build the title from the connected product and variant instead. Pick Product, Variant, Product + variant or + price, or pick Custom and write your own template with {productTitle}, {variantTitle} and {price}. Rename the connected product in Shopify and the storefront title follows, with no edit needed here. Translations for it come from Shopify's Translate & Adapt, since the words are the product's own title and variant name, not text you typed.
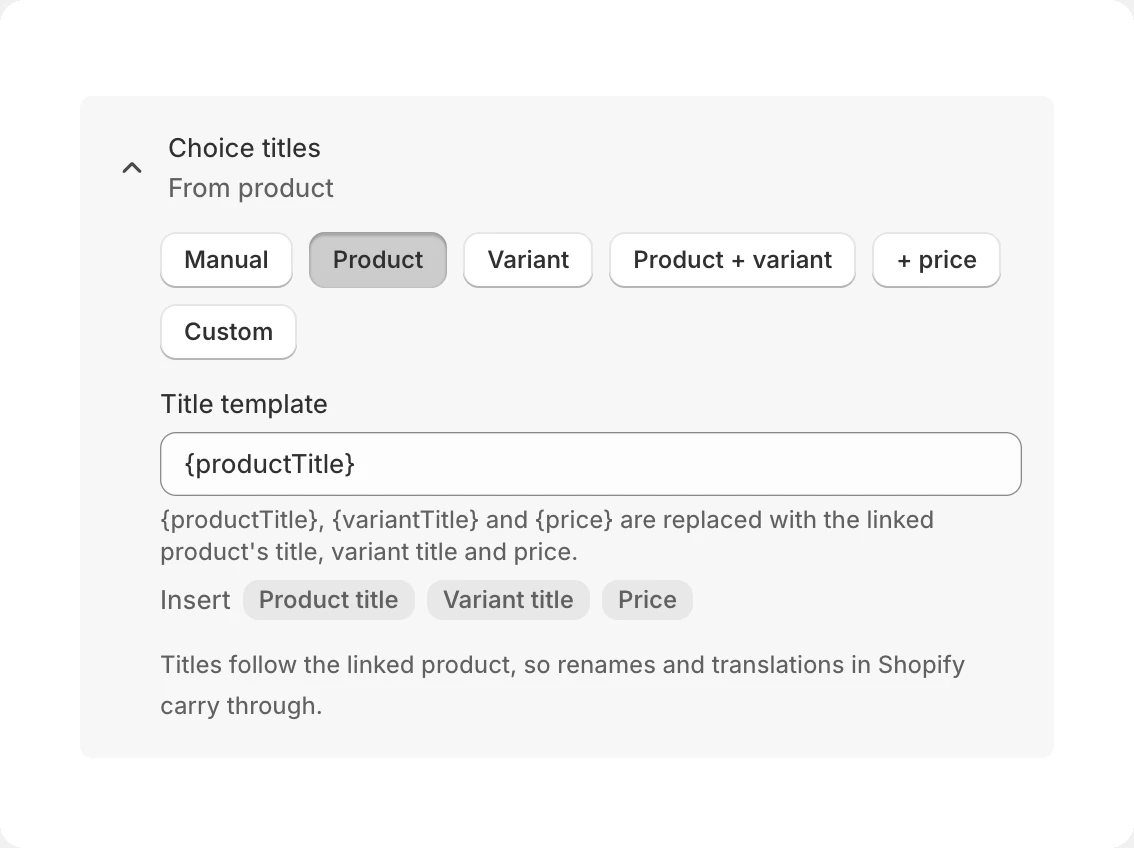
If you also show a price next to the choice with Show component pricing, adding {price} to the template shows that number a second time. That's expected: the template always reads the product's own price, whatever else you display alongside it.
A single choice can opt out with Edit next to its title, which switches it back to a typed title, starting from the text it was showing. Use product title puts it back on the template. Switching the whole option back to Manual shows the titles you typed before, so nothing is lost either way.
Hiding an Option from Customers
Hide option from customers takes an option off the product page without deleting it. It still runs: Optionfier picks its default choice (or its first choice) automatically, that answer still rides to the cart and the order, and it still deducts stock from a linked product. Use it for something you decide rather than the shopper, like a fixed component every order includes.
Two things follow from that. A hidden option can't be required and can't start with nothing selected, because there's no field on the page for either to apply to. And since the shopper has nothing to change, the storefront's own sold-out and quantity checks sit hidden options out, so checkout is the only thing standing between a shopper and an oversell (see Options shown as Text on order).
Conditional Visibility
You can show or hide an option based on the value of another option in the same option set. A "Would you like engraving?" checkbox, say, with an "Engraving Text" field that only appears when the customer checks yes. Open the settings for the option you want to show or hide, enable the visibility condition, pick the option whose value controls it, and pick the value that triggers it.

Appears As: Bundle Items or Text on Order
Every option that collects a value shows an Appears as selector in its card header, with two modes. (Inventory syncs have none, since they're always text on order.) About this mode next to the selector explains whichever one is active.
- Bundle items: each choice is a real product sold as part of the bundle. Its price adds to the bundle total, and Shopify tracks its inventory automatically.
- Text on order: choices appear as text in the cart, at checkout and on the order, and never change the price. You can still link a choice to a product, and Optionfier manages its inventory in the background.
The setting is per option, so mixing the two inside one option set is normal: a frame picker can sell real components while a gift note on the same product rides along as text. Show component pricing puts each choice's price next to it on the product page, and it's only offered on Bundle items options, since text ones never change the price.
Per-Choice Settings
Each choice has its own settings for inventory linking, pricing and quantity, inline on the choice's row.

Connecting a Product to a Choice
Click Link product on the choice's row and pick a product and variant. Once linked, the product shows in a card with a menu to Replace, Edit or Remove it.
For Bundle items, a connected product is required on every choice: the connected variant becomes a bundle component and Shopify manages its inventory. For Text on order it's optional. Linked, Optionfier tracks that variant's inventory in the background; unlinked, the choice is purely a custom input with no inventory implications.
One limit there: variants fulfilled by a third-party service (3PL) can't be linked in Text on order options or inventory syncs. Set the option to Bundle items instead, since Shopify's native bundle expansion routes third-party fulfillment on its own.
Quantity
Set the Quantity for the connected product. It defaults to 1, and you raise it when picking this choice should consume more than one unit: a "Double Layer" choice that deducts 2 units of fabric, say.
The quantity can also depend on another option. On a single-select choice list set to Bundle items, in a standard option set, the Quantity card offers Same for every customer or Depends on what the customer picks in …, where you choose the controlling option and fill in a quantity for each of its values. Anything you leave blank counts as 1. It doesn't apply to Build-a-Box, and it doesn't apply to text-on-order options.
Pricing for Bundle items
A linked choice in a Bundle items option has one Price field, and it's editable. Leave it blank and the choice charges the connected variant's own Shopify price, which shows greyed out in the field so you can see what that price is. Type a number in and that's what the customer pays for this component instead.
Text on order options have no price field at all: the connected product's standard Shopify price is used as-is. If you need discounted pricing on products sold that way, use Shopify's own discount codes or automatic discounts.
Default Selections
For selectable options you can mark one choice as the default, and it's pre-selected when the page loads. For checkboxes, you set whether each one is checked by default.
Required options work differently. Optionfier won't pre-fill one on the customer's behalf unless you've explicitly marked a choice as the default and that choice is in stock. Otherwise it opens with nothing selected, and the customer is held at Add to cart until they choose.
An optional option can start the same way. Turn on Start with nothing selected in the option's settings and it loads empty, overriding any choice you've marked as the default. Once a shopper picks something, a Clear control lets them go back to nothing.
How Options Appear, and Who Tracks Inventory
Inventory handling follows from one setting, the Appears as selector described above.
Text on order: the choices appear as text details.


Bundle items: the choices appear as bundle components with their own prices.


Options shown as Bundle items
These choices become a native Shopify bundle: the parent product with the choices as components beneath it, just like Shopify's own bundled products. Shopify handles inventory for each component and decrements it at checkout. For an option that takes typed input rather than a list of choices (a text field, a file upload, a date), the linked variant is still added as a bundle component so Shopify tracks its stock, and what the customer entered still comes through on the order.
Charge for this product is a group-level setting that sits beside this one. Enabled, the connected product's own price is added as a line item on top of the options, and every bundle sold counts one unit against its stock. Disabled, the product isn't charged and its stock isn't touched, which is the right setting for a product that's just a container. It still appears at 0.00 if option answers are set to show on its own line.
Options shown as Text on order
These choices appear as text details on the order. This works with every theme, no special configuration needed, and it's the right pick for special instructions, engraving text, gift notes and anything else that shouldn't change the price. A connected variant is optional here. When you do link one, Optionfier tracks its stock, marks the choice sold out on the storefront while it's out (see Sold-Out Behavior), and deducts the stock at fulfillment rather than at checkout.
Two things stop an oversell, and they run in different places. On the product page, Optionfier's script greys out a sold-out choice and holds Add to cart when a choice is in stock but there isn't enough of it for the quantity asked for. At checkout, a rule on Shopify's own servers refuses any cart that claims more of a linked variant than you have, even if the storefront script never ran, and names the choice that ran out. A hidden option is covered too, but there the message can only name the product ("Product name is not available in the quantity requested"), since the shopper never saw the choice. Neither check covers Shopify POS or subscription renewals, because neither goes through that checkout.
One more cap sits alongside them. Maximum per cart line (50 by default, editable per option set once it has a linked choice) refuses a single cart line asking for more than that many. Raise it if you genuinely sell that product in those quantities on one line.
Where text answers appear on the order
The Where option answers appear on orders card decides where a text option's answers live once the order exists. It's a group-level setting, one choice covering every text option in the set.
- Order's bundle grouping (no separate line): the answers attach to the order's bundle grouping rather than to any single line. Nothing extra appears in the cart, but the answers don't print on packing slips or Order Printer.
- This product's own line: the connected product keeps its own line and the answers ride on it. Pick this when the people packing your orders work from a printed slip. Packing slips also need a one-time template edit before any option value prints at all, see Showing Options on Packing Slips.
Subscriptions
Bundle items isn't compatible with Shopify subscriptions today. If you sell subscription products that need custom options, set those option sets to Text on order instead. Support for bundle items is on our roadmap.
Bundles
A bundle is a real Shopify product made of several component products, defined in Optionfier and sold as one thing. A gift set with three fixed items in it, a starter kit, a two-bottle pack. Click New bundle, add the products that go inside, and you've got a Shopify bundle with its own price, optional variants, and per-component inventory.
Every bundle has a Title and a Status of Published, Unlisted, or Draft. Saving is instant, but the push to Shopify runs in the background, so you'll see a Syncing to Shopify banner for a few seconds, and a Retry button in its place if that push fails.
Bundles vs. Bundle items vs. Build a Box
Three ways to sell a bundle, and the difference is who decides what goes in it.
- A bundle is you deciding, fixed. The contents are the same for every customer, so there's nothing to configure on the product page. The shopper just adds it to the cart.
- An option shown as Bundle items is you deciding the structure and the customer filling it in. You define the options ("Frame Material", "Add a Candle") and each choice they pick becomes a component.
- Build a Box hands the structure over. You define a pool of products and a box size, and the customer assembles whatever combination they want.
All three check out as a parent line with real component lines beneath it, so Shopify decrements every component at checkout in each case. A plain fixed bundle rides Shopify's own bundle machinery, and the other two are assembled by Optionfier instead. Shoppers see the same thing either way. Pick based on how much of the decision belongs to the customer.
Components
The Components card holds the products inside the bundle. Click Add products and pick them.
Qty per bundle is how many units of that product a single bundle consumes. A six-pack of the same beer is one component with a quantity of 6, not six separate rows. The stepper only shows while the bundle has no variant options; once it has them, quantities are set per variant in the Variants table below, and each row gets an Applies to button for choosing which variants contain that component. The card's More menu adds a fee product, an ordinary component you use to charge for the bundle itself (packaging, assembly). The same menu's Include the bundle product as its own line item puts the bundle product on the order as its own line.
Pricing
While the bundle sells as a single product, Price is the sum of its components' prices, and it moves when a component's price changes in Shopify. Enter a number to give it a custom price, and click Use sum of components to go back to the sum. Compare-at price fills in with the sum while your price sits below it. Type your own to break that link, and Reset to auto restores it. Add a variant option and the Pricing card goes away: from then on each variant carries its own price and compare-at price in the Variants table, and each one is the sum of its components or a custom price on its own.
A sum-of-components price also sets the bundle's price in your Shopify catalogs, for Markets and B2B. In a catalog where any component has its own price, the bundle's price there is the sum of the components' prices in that catalog. Where none does, Shopify's own converted price applies.
While a price is the sum of its components, Optionfier owns it in every catalog. Change one of those catalog prices in Shopify and Optionfier puts its own back at the next check, which runs about hourly and after every save. To set catalog prices yourself, give the variant a custom price first, here or by changing its price in Shopify. Optionfier then removes the catalog prices it set and leaves yours alone. Use sum of components hands control back, and the next check replaces any catalog prices you set.
Variant Options
Most bundles sell as a single product. Add a variant option when customers should choose between versions of the same bundle: a pack size, a color, a "with glassware" and "without" split. Click Add variant option, give the option a name, and add its values one at a time. They become real variants on the bundle product, exactly like options on any other Shopify product.
The Variants table below lists every combination, with a Price and Compare-at price per row and a disclosure that opens that variant's own components and quantities. Drag the option rows, and the values inside them, to reorder. Delete a row to exclude a combination you don't sell: deleted rows hide behind Show deleted, and restoring one creates a brand-new variant with no SKU, barcode or inventory history. Shopify caps a bundle at 3 variant options and 2,048 variants, so you'll get a warning banner as you approach the variant cap and a blocking one past it. Variant images, SKUs and barcodes are edited in the Shopify product editor, not here.
Bundle Volume Discounts
The Buy more, save more card rewards shoppers for buying more. Turn on Reward bigger orders with a discount and set your tiers. You can apply the discount across the whole bundle, or scope it to specific variants.
Bundles in Cart and Checkout
At checkout, a bundle shows as the bundle product on top with its components beneath it, each with its own price. Shopify decrements every component's inventory, and refunds and restocks work the standard Shopify way because each component is a real line item. If your theme's cart shows only the bundle product, see Bundle components aren't showing in the cart.
Inventory sync
Inventory syncs add nothing visible to your storefront. They deduct stock from linked variants when the trigger product is fulfilled. Use one when fulfilling a product should draw down other products' stock: a curated gift box, a starter kit, a sampler pack whose items you also sell on their own. The sync runs in one direction only, so restocking or editing a linked variant never touches the trigger product.
Setting Up an Inventory Sync

- Click New inventory sync from the main page, give it a name, and connect a trigger product (the product whose fulfillment triggers inventory deductions).
- Add linked variants (the product variants whose inventory should be deducted when the trigger product is fulfilled). Each row names one specific variant and a quantity to deduct.
- If your trigger product has more than one variant, a Trigger Matching Mode card appears. All variants means any fulfilled variant deducts the same linked variants; use it when every variant of the trigger product contains the same components. Per-variant gives each trigger variant its own deductions, for when a "Small Gift Box" and a "Large Gift Box" hold different things. A single-variant trigger product has nothing to choose between, so the card stays hidden.
- Toggle to Published and save.
Build a Box
Build a Box lets your customers assemble their own bundle: pick 6 beers for a 6-pack, fill a gift box with treats, put together a sampler. You define the pool of products and how many items fit in the box; the customer does the fun part. Every item they pick becomes a real line item at checkout, with its own price and its own inventory. If someone puts three IPAs in their 6-pack, your IPA stock drops by three. No manual reconciliation, no overselling items that only exist as text on an order.

How a Box Works
A box is built around one box product: the product that represents the box in your store (the "6-Pack" or "Gift Box" product). It's what the customer adds to the cart, but it's not what they end up paying for. When the finished box hits the cart, Optionfier expands it into one component line per picked item, and those components are what the order is actually made of. Shopify then decrements each component's inventory, the same way it does for bundle items.
By default the box product behaves like a container: it groups its components in the cart and checkout, but its own price isn't part of the total. If the box should cost money in its own right (a nice wooden crate, say), turn on Charge for the box product and the box product joins the bundle as a paid line. Its price is the one set on the product in Shopify, so use Edit product on the box's Box product card to set it.
Creating a Box
- Open Optionfier from your Shopify admin, click New Build-a-Box, and give the box a name. The name becomes the title of the box product, so customers see it in the cart, at checkout and on their orders.
- Under Contents, click Add products and pick the products customers can choose from.
- In Box rules, set how many items go in the box: Minimum picks and Maximum picks, or enable No maximum to let customers add as many as they like.
- Toggle the box to Published and save.
The first save creates the box product in Shopify. It's priced at 0 and doesn't track inventory, so it can never sell out. If the box is Published, the product is Unlisted: it works on your Online Store but stays out of collections and search. Otherwise it's a Draft. Optionfier puts it on the Online Store sales channel only, which needs a one-time publishing permission. The box editor shows a banner asking for it. Without it the product is still created, but you'll have to publish it in Shopify yourself.
To use a product you already have, choose Select existing before the first save. It has to be available on your Online Store, but it doesn't have to be browsable. Replacing or removing the product, or deleting the box, leaves the product in Shopify.

Contents
The Contents card holds the pool of products customers pick from. Drag the cards to set the order they appear in on your storefront, and click a card to open that product's settings:
- Let shoppers choose the variant. When a product has multiple variants (sizes, flavors), customers pick which variant goes in their box. Use Variants > Manage to limit which variants are offered; by default all of them are.
- Editorial. Two optional lines of text shown under the product name in the box: Details and Additional details. Good for tasting notes, ingredients, or a one-line pitch per product.
- Promote this product. Shows the product as a larger featured tile. It only takes effect when the layout renders a hero card, which means the Card layout in the composer is set to Mosaic.
Box Rules
Beyond the minimum and maximum pick counts, box rules let you limit how many of each item a single box can contain. Customers can add multiples of the same item (three of the same IPA counts as three picks), so without a rule the only ceiling is the box maximum. Add a rule, set Limit each selected item to a number, and pick which products it covers. The pinned All other items rule catches everything you didn't assign, including products you add to the box later. Set a limit of 1 and the quantity stepper disappears from those cards entirely.
Sections
Sections group your box products under headers customers see while building: "Reds", "Whites", "Snacks". Each product belongs to one section. Anything you leave unassigned still shows, as an unheaded group at the top of the list. Sections are purely presentational: they don't constrain what customers can pick, they just keep a large pool scannable.
Whether they actually display is a layout decision. The composer's grid settings have a Group products into sections checkbox; turn it off, or use a layout that renders products as a single list, and your section headers won't show even though they're defined here. The Sections card warns you whenever the current layout won't render them.
Starter Packs
Starter packs are curated selections customers can apply in one tap, then tweak: "The Sampler", "Fan Favorites", "Date Night". Each pack has a name, an optional description, and a list of member items built from the products already in the box, each with a specific variant and quantity. An empty grid asks the customer to make every decision; a starter pack hands them a finished box they can edit. You control how packs display on the storefront (cards, chips, or in the product grid itself) from the layout composer.
Add-ons
Add-ons are extra products offered alongside the box: a greeting card, gift wrap, a bottle opener. They don't count against the box's pick limits. Each add-on has a title, an optional subtitle, and an Override price if you want to charge something other than the linked variant's own price. Add-ons are real products with linked variants, so their inventory is tracked like everything else.
An add-on can also be a free gift. Tick Free gift and set a threshold, either a number of items in the box or a box subtotal. Under the threshold the add-on is charged normally; once the box reaches it, the add-on is charged at $0.00. The rule is enforced at checkout, not just in the builder, so a shopper can't keep the gift by trimming their cart afterwards.
Box Options
Box options collect a choice, a yes/no answer, or free text from the customer, on top of the products they pick. Three types are available: Choice (dropdown or buttons), Yes/no (checkbox), and Text. The key setting is Where to ask:
- Whole box: asked once for the entire box. A gift message, wrap selection, or delivery note.
- Every item: asked for each item the customer picks. Engraving on each product, for example.
- Specific products: asked only for the box items you specify.
An option can also be Required, so the box can't be added to the cart until it's answered (a required per-item option needs an answer on every item it covers). Priced is either No charge, Charge a set amount once per box or once per item, or Link to an add-on, which adds that add-on product's price and tracks its inventory. And Conditional shows or hides the option based on another option's answer, same idea as conditional visibility on standard option sets.
Buy More, Save More
Volume discounts reward bigger boxes. Enable Reward bigger boxes with a discount and add tiers: "buy 6, save 10%; buy 12, save 15%". Tiers can be based on the number of items or the box subtotal, and each tier can take a percentage or a fixed amount off. Customers see a "save more" nudge on the box as they add items, so the discount actively pulls the box size up.

Under Advanced you choose how the discount applies:
- Automatic discount (the default, and the one to start with). The savings show as a discount line at checkout, applied automatically, no code for the shopper to type. Optionfier creates this discount in your store, so you'll be asked to grant it permission the first time.
- Built into the price. The savings are baked into the item prices. There's no separate discount line at checkout, and it keeps working even when the customer uses another discount code, which is the reason to reach for it. The tradeoff: fixed-amount tiers aren't available in this mode, only percentages.
You can also exclude the box product's own price from the discount (relevant when you charge for the box) and set the prefix Optionfier puts on the code it generates. Once the discount is live the card shows that code with a Copy button, and the prefix locks: to mint a new code, turn the discount off, save, then turn it back on.
Box Settings
Show low-stock badges badges each box product that's running low, with a threshold you set; sold-out products are badged automatically either way, and can't be picked. After adding the box to cart decides what happens once the customer adds their finished box: Stay on the page (the theme's default, usually your cart drawer), Go to the cart page, or Go straight to checkout.
Storefront Layout
The Storefront layout card lists the three surfaces the builder can appear on (Box page, Product pages, and Other pages). Click one and the Customize layout composer opens for that surface. Layouts are per surface, so the box page can run a dense grid while the product-page block stays compact, or a surface can inherit the shared design until you customize it. If you need to go beyond the built-in controls, Advanced settings accepts custom CSS applied to the storefront box builder.

Inside the composer:
- Template. Pick one as your starting point; each has its own personality, from dense grids to editorial lists. Every setting stays reachable no matter which one you picked, and the moment you change something the composer marks your design as Custom.
- Layout controls. Inset or full-bleed images, image fit, card size, card layout, and more. You can also show, hide, and reorder the builder's building blocks: the heading, starter packs, the progress indicator, the summary, box options, add-ons, the Buy more, save more nudge, the add-to-cart button, and a Surprise me button that fills the box with random in-stock items for customers who'd rather not decide.
- Theme. Switch the Editing dropdown to Theme for the pieces every surface shares: the accent color, corner rounding, and What do you call your box?, the noun ("crate", "case", "bundle") used across the storefront copy: "Build your crate", "In your crate".
Where the Box Appears
One box, three surfaces. The box page exists automatically for every published box; the other two only show something once you add the BYOB block to them in the theme editor:
The box page. Every published box with a box product connected gets its own page at /apps/optionfier/box/<handle>, wrapped in your theme's header and footer. The handle comes from the box's name, so "Build Your Own Coffee Box" lands at /apps/optionfier/box/build-your-own-coffee-box. Click the Box page row in the Storefront layout card to open the composer, where the URL handle, Open page and Copy link live. Share that link or put it in a menu, no theme editing required. The /apps/optionfier/ prefix is your store's app proxy path, and you can change it in your store's app settings (Shopify's guide).
Your product pages. Add the Optionfier: BYOB block to your product page template in the theme editor, the same way you add the standard Optionfier block. A box product Optionfier creates uses your theme's default product template, so that's where the block has to be. It renders the builder for whatever box is connected to that product, either inline on the page or as a popout drawer. Block settings also let you choose whether the box uses the theme's add-to-cart button or its own, and whether to sync the theme's displayed price as the box total changes. There's a companion Optionfier: BYOB Link block too, a button labeled "Build your box" by default: it opens the drawer if a popout box is on the page, scrolls to an inline one if there is one, and otherwise sends the customer to the box page.
Any other page. The Optionfier: BYOB block is also available on non-product templates: a landing page, a collection page, a dedicated "build your box" page you design yourself. Since there's no product to key off, you paste the box's ID into the block's settings. Copy it with the Copy ID button in the layout composer's Other pages view, or grab it from the box's URL in the Optionfier admin.
The Box in Cart and Checkout
At checkout, the box shows as the box product with the picked items as component lines beneath it, each with its own price, and Shopify decrements each component's inventory. Some themes show the same list in the cart, as below. For the rest, see Bundle components aren't showing in the cart.


Boxes and Subscriptions
Subscribing to a recurring box is coming soon, and the Subscriptions card in the box editor shows where it stands; Subscriptions covers how bundle items behave with subscription products today.
Languages and Translations
If your store sells in more than one language, Optionfier can show shoppers your options, your Build-a-Box copy and its own storefront wording in their language. You edit everything inside Optionfier. No theme changes, no third-party translation app.
Optionfier reads the languages you've set up under Settings > Languages in your Shopify admin, and asks for permission to read that list the first time you reach for a translation feature. Languages you've added but haven't published yet show up too, marked Unpublished, so you can translate ahead of a launch.
Translating an Option Set
Open any saved option set and click Translate in the page header. If your store has only one language, or Optionfier doesn't have permission to read your language list yet, clicking it opens a short explainer instead of the picker: either a Grant access button, or a note telling you to add a language under Settings > Languages.
- Pick the language you want to translate into. The strip above the cards then reads Translating [language] and counts how many fields are done.
- Every text field that shoppers see (labels on the product page, choice names, placeholder text, color names, static content) becomes a translation input, with your original wording shown as the hint. Leave a field blank and shoppers in that language see the original.
- Everything else in the editor (prices, product links, rules, adding, removing and reordering) is locked while translating. Back to [your language] brings it back.
- Save stores every language you touched at once. Discard drops them all.
Auto-translate fills every empty field for the current language with a machine translation and marks each one Auto-translated until you edit it. Treat it as a first draft. Use Change language in the strip to move to another language without leaving translation mode.
Translating a Box
Build-a-Box groups use the same Translate button. A box's text is spread across many cards, so entering a language swaps the editor for one Translations sheet with every piece of shopper-facing text in one place: the box noun and extras label, section names and descriptions, starter pack names, add-on subtitles, and each product's Details and Additional details. Each group of rows has its own Auto-translate, and the sidebar stays visible but locked. Leaving translation mode brings the normal editor back.
What Shoppers See
The product page and the box page follow the language of the storefront the shopper is browsing. Optionfier looks for an exact match first (say fr-CA), then the base language (fr), and falls back to your original wording for anything you haven't translated. Shopify POS uses the same translations, picking the language from the device's locale instead of a storefront language.
Dates and times in the date picker and time picker also follow the storefront language on their own. Month names, weekday headers and hour labels come out localized with no setup.
What Stays in Your Store's Language
The text written to the cart, checkout, order confirmation and the order in your admin stays in your store's primary language. That one line of text reaches both the shopper and you, and your packing slips, fulfillment and order lookups all match on it. Translating it would break them. So a shopper who chose Jaune on a French page sees Yellow on the order line.
Storefront Text
Optionfier writes a bit over a hundred short strings of its own on the storefront: sold-out labels, Choose an option, the date picker's buttons, the Build-a-Box progress messages, and so on. They ship in English, French, Spanish, Portuguese and German. To change any of them, or to supply wording for a language Optionfier doesn't ship, go to Settings in the app and click Edit storefront text.
The modal lists every string grouped by surface (Options block, Date picker, Build-a-Box). Pick a language at the top. Overrides are stored per language, so a store that sells in English and French keeps a separate set for each. Blank means "use Optionfier's wording", and Reset clears a single row.
Placeholders like {count} or {boxNoun} get filled in on the storefront. If you leave one out of an override, the modal warns you.
Sold-Out Behavior

When a choice is linked to a product variant and that variant runs out, the choice is labeled Sold Out on your storefront and can't be picked. That covers any option a customer picks from a list: dropdowns, radio buttons, pill buttons, checkboxes, color swatches and image swatches. The rest of the choices stay selectable.
You don't have to do anything to keep this current, but it isn't instant. Option data is cached so your product pages stay fast, which means a variant that just sold out can take up to about two minutes to show that way, and the same when stock comes back. Checkout still refuses a variant that has actually run out, so a shopper who slipped through that window is caught there.
Per option set you can also turn on Show low-stock notice and set a Low-stock threshold, which puts Only X left next to a choice whose linked variant is running low. It only shows where Optionfier has an honest number to show: a tracked variant with somewhere between 1 and your threshold left.
Turn on Apply sold out to the entire option set in the option set's settings and one fully sold-out option marks the whole set sold out, which disables add to cart for the product. Use it when every option is a required component: a phone case where the customer has to pick a material and a color, and every color is gone, isn't a sale you can fulfill. Off, which is the default, each option's sold-out status is independent, so one option can be fully sold out while the product stays purchasable. Options that are shown only under a condition never trigger it, because the shopper can skip that branch.
Refunds and Restocks
When you process a refund in Shopify, the refund screen has a Restock items checkbox on each line item. Optionfier honors that choice automatically: for any inventory it manages on your behalf, stock is returned the moment you submit the refund. Behavior differs slightly depending on the option's Appears as mode.
Refunds for Bundle items
When an option is set to Bundle items, each selected choice is its own real Shopify line item, with its own variant, price, and inventory. Refunding works exactly like any other Shopify product: pick which component lines to refund, check Restock items on the ones you want back, and Shopify returns the stock itself. Optionfier doesn't need to step in. You can refund the whole bundle or just specific components.
Refunds for Text on order
When every option in the set is set to Text on order, the parent product is the only line item on the order. Connected variants don't appear as separate items, but Optionfier still tracks their inventory, so refunding the parent line with Restock items checked brings that stock back. It returns inventory to every variant that was deducted at fulfillment time, in the per-choice quantity you configured (a choice set to "deduct 2 per order" returns 2 units per refunded unit of the parent). Partial refunds work correctly: refund 1 of 3 units now and the remaining 2 later, and Optionfier restocks the right amount each time, allocated against the original fulfillment. Uncheck Restock items and nothing comes back, the same way Shopify behaves with its own products.
Shopify sometimes sends a refund line with no location on it (legacy refunds, some POS refunds, some third-party fulfillment flows). Optionfier can't tell which location to return the stock to, so it skips those lines rather than guess, and you'd have to adjust that variant by hand. Inventory syncs follow the same rules: refund the trigger product with Restock items checked and each linked variant gets back the quantity it was set to deduct.
Cancelled Fulfillments
If you cancel a fulfillment (say you fulfilled an order and then had to undo it because of a packing error), Optionfier returns the inventory that fulfillment had originally deducted, minus anything that was already restocked through an earlier refund. This applies to both Text on order options and inventory syncs. Bundle items components are handled by Shopify directly because each component is a real Shopify line item.
Managing Option Sets

Home lists everything you've built, whatever kind it is, and you can search it by option set name or product name. That's all it does: no status filter, no bulk actions.
The actions live on the per-kind pages in the left nav: Options, Bundles, Inventory sync, and Build-a-Box. Select rows on one of those and you get Enable, Disable, Duplicate and Delete. Duplicate needs exactly one row selected. It copies that option set's whole configuration, which is the quickest way to reuse a setup on another product. (The Bundles page offers Duplicate and Delete only.)
Inside an option set, drag options into the order you want, and drag the choices inside an option the same way. The order you set is the order customers see.
Importing and Exporting
Export your option sets to a file, edit them offline, and import the changes back. It's how you bulk-edit a lot of option sets at once, keep a backup, or move a setup to another store. Everything here is under Settings in the left nav.
Exporting
Tick the kinds of option set you want (Options, Inventory sync, Bundles, Build-a-Box, each with a count of how many you have), choose Excel or JSON, and press Download. Pick one kind and you get a single file; pick more than one and you get a zip with one file per kind inside.
JSON is the complete snapshot of your option sets (translations don't travel through export either way). Excel isn't, and the gaps matter:
- Build-a-Box exports as JSON only, for now. Its checkbox is disabled when Excel is selected. If you want to back a box up, switch to JSON first.
- Bundles in Excel name their components by SKU. A component whose variant has no SKU is written as its variant ID instead. If two variants in your store share a SKU, re-importing the file stops and asks you to swap in the variant ID. An Excel import also re-reads each component's price from Shopify, so a bundle priced as the sum of its components picks up today's prices.
- The low-stock notice, its threshold, and the per-line quantity cap have no Excel column. Editing a file in Excel won't wipe them (a setting the file doesn't mention is left alone), but an Excel export can't carry them to another store. JSON can.
- IDs. JSON preserves every one. Excel preserves option-set and option IDs through the
Set IDandOption IDcolumns, but choice IDs are minted fresh on re-import.
Re-import a JSON export file exactly as it came out and nothing in your shop changes. That's the default MERGE behavior, below. A zip is not importable yet: unzip it and import each file on its own.
Importing
Every import file belongs to exactly one kind of option set, and Optionfier detects which one from the file itself: a JSON file names it, an Excel file's sheet name says it. You never pick a kind when importing. A file whose rows don't match its own declared kind, or that reuses a handle already in use under a different kind, is rejected.
Pick Choose file under Settings and select a .xlsx or .json file, up to 20 MB. The Download Excel sample and Download JSON sample links next to the picker give you a reference file covering every option type, handy when you're hand-authoring instead of exporting first.
What happens next:
- Optionfier validates the file. If it's clean you get a summary of what will change and an Import now button. If it isn't, you get the problems listed by row and the button stays disabled until you upload a corrected file.
- A banner tracks the run: "Import in progress…", then "Import complete", "Import complete, with warnings", "Import failed", or "Import cancelled". Small files finish in seconds. A few hundred option sets can take a few minutes.
- Recent imports under the picker auto-opens when an import starts and records the result. It keeps your last 10 imports, with counts, warnings, and the error message on a failure. Once the banner is gone, that list is where you look.
Imports are all-or-nothing. If anything fails mid-write, the whole thing rolls back and your shop stays exactly as it was.
Only one import runs at a time per shop, and there's no limit on how many option sets one file can hold. Older export files that carry an Inventory Engine of LINE_ITEM_PROPERTIES still import fine: every option in them comes in set to Text on order, which is what that setting meant.
MERGE and NEW Commands
Every option-set row has a Command column with two valid values:
- MERGE (default) updates the option set if one with the same handle already exists, and creates it if not. A blank cell means MERGE.
- NEW always creates a fresh option set, even if the handle matches.
Exported files come pre-filled with MERGE on every row, so export, edit, re-import updates in place and never duplicates.
Handles have to be unique per shop. If a NEW row reuses a handle you already have, validation warns you about it and the import then fails with "Some items in your import already exist in this shop." Pick a different handle before you import.
Options and choices always inherit their parent option set's command. You can't mark a single option NEW under a MERGE option set.
What Stays the Same on Update
When MERGE updates an option set, anything the file doesn't set is left alone. If your file has no Group Enabled column, the published/draft state doesn't move. If a row's Product ID is blank but the option set already had a product, the connection stays. That's what makes partial edits safe: a file that only changes labels only changes labels.
Options work the same way. Choices don't. The file's choice list replaces an option's choices wholesale, so a choice you delete from the file is a choice you delete from the option.
Common Conflicts
If validation blocks your import, each problem comes with the row number and a plain explanation. The three you'll actually hit:
- A product is already connected to another option set. A product can only belong to one option set. Disconnect it from the other one first, or drop the Product ID from this row.
- The same product is claimed twice in one file. Two rows in your own file point at the same product. Remove the Product ID from one of them, or merge the rows.
- The handle already exists. Covered above: pick a unique handle.
Tips for Editing in Excel
- Keep
Set IDandOption IDfilled on rows you want to update. Those IDs are what let MERGE update the existing row instead of creating a duplicate. Clear an ID and that row becomes a create. - Add a new choice by adding a row with the parent option set's handle, the parent option's handle, and a blank
Option ID. - Remove a choice by deleting its row. Choice lists are replaced wholesale, so a deleted row is a deleted choice.
- Rename a handle by editing the cell and keeping the ID.
- Quantity defaults to 1. Leave
Option Quantityblank unless you want something else. - Column widths, fonts, and cell colors don't matter. Optionfier reads the data, not the styling.
Every column and field, with accepted values and defaults, is on the import file reference page.
Viewing Uploaded Files on Orders

Optionfier adds an Uploaded Files block to the order details page in your Shopify admin. It lists every file uploaded on that order with its option label and a link to open it.
Files land there shortly after the order is placed. Until one finishes processing it's labelled (processing), and the link works once that's done.
Showing Options on Packing Slips
Option values show on the order details page automatically, but they don't appear on printed packing slips until you add them to your packing slip template. This catches a lot of stores out: an engraving message or gift note is clearly visible in the admin, then prints as a blank line for whoever is packing the box.
That's a Shopify default, not an Optionfier setting. Shopify's stock template never loops over line item properties, which is where every option value lives. It's a one-time edit.
Adding options to your packing slip
- In your Shopify admin, go to Settings > Shipping and delivery.
- Scroll to the Documents section and click Templates.
- Click Packing Slip.
- Find the
<div class="flex-line-item-description">block. Inside it is a<p>holding the item's title, variant, and SKU, followed by a{% for group in line_item.groups %}loop. If you've edited your template before, or you're on an older one, that class may not be there. Look for the block that renders{{ line_item.title }}instead. Same place, whatever it's called in your template. - Paste the snippet below after that
groupsloop and before the closing</p>. - Click Save, then print a packing slip for a recent order to confirm.
{% for property in line_item.properties %}
  {% assign property_prefix = property.first | slice: 0 %}
  {% if property.last != blank and property_prefix != '_' %}
    <span class="line-item-description-line">
      {{ property.first | escape }}: {{ property.last | escape }}
    </span>
  {% endif %}
{% endfor %}
Paste it exactly as shown, escape filters and all. Option values are free text your customer typed, and Liquid prints them raw otherwise, so a gift note like Leave it <at the back door> loses everything between the angle brackets.
Use a <span> with the line-item-description-line class. The template already styles that class as display: block, so each option prints on its own line. If your template uses a different class name for its description lines, use that one. If it has no such class, add display: block to the span yourself or every value prints run together. Don't swap in a <div>: these lines sit inside a <p>, and a <div> there closes the paragraph early and breaks the item's layout.
Why the snippet skips properties starting with an underscore
Shopify treats a line item property starting with _ as hidden, the convention for data an app carries through the order that no human should read. Optionfier writes a couple of these: _optionfier holds the signed picks on any Bundle items or Build a Box line, and a file upload adds a token named like _opfr_upload_os-1. The property_prefix != '_' check keeps both off your slips, and property.last != blank does the same for options the customer left empty.
Bundles print across two pages
A packing slip covers one shipment, not the whole order. A bundle's own line doesn't require shipping, so it's fulfilled separately from the products inside it, and Shopify prints two pages: the component products on one, the bundle's own line carrying the option values on the other. Each page notes that other items ship separately.
Components are labelled Part of: [bundle name] so you can match the pages up. That label comes from the template's line_item.groups loop, which is already there. Only the option values need the snippet above.
The catch: the engraving or gift message for a bundle prints on the bundle's page, not next to the components being picked. If your packers work from the component page, tell them to check both.
Point of Sale
Optionfier includes a POS extension that brings your product options into Shopify Point of Sale.
What It Does
Staff view and select custom options when adding products to a POS cart. Selections are stored as line item properties and flow through to the order, the same as they do from your online store.
Setting Up POS

- In your Shopify admin, go to Sales Channels > Point of Sale > Settings.
- Find Set product options at POS by Optionfier.
- Under Additional areas, click Add to enable Optionfier in the Cart line item details area. That's what lets staff reach options from the line item menu.
- Optionally add the Smart grid tile for a quick-access tile on the POS home screen covering every cart item at once.
Once added, Optionfier shows up the next time staff use POS on any device connected to your store.
How to Use It

When a product with configured options is added to a POS cart, staff get to the options two ways: the Smart grid tile on the home screen (if you added it), which lists every cart item that has options, or Set Options / Edit Options from the line item menu for one item.
Staff see the same options and choices you configured in the admin. Required fields are enforced and sold-out choices are disabled, just like the storefront.
If you've translated an option set (see Languages and Translations), POS shows staff the translation matching the device's language. The text written to the cart line stays in your store's primary language, same as online.
Differences from the Online Storefront
POS is a different environment, so a few option types behave differently:
- File uploads aren't supported. Staff see a dropdown with "Not applicable" and "Follow up required" instead. Pick "Follow up required" to flag that the file has to be collected another way, like the customer emailing it. If the line already carries an uploaded file (from the storefront or an earlier POS edit), a third choice, Keep existing file, appears first so staff can change other options without wiping it.
- Color picker has no visual picker. Predefined colors show as a list of names; dynamic colors are a plain hex field staff type into (
#FF5733). - Date picker is a full calendar, and your date restrictions (minimum and maximum dates, allowed and blocked dates, day-of-week rules) are enforced there the same as on the storefront.
- Time picker is a basic time selector. Minimum and maximum times and the minute step aren't enforced in POS.
- Selectable options show as a choice list, except a set using the Product grid display format, which draws as swatch-style buttons with linked-variant thumbnails where it has them. The choices and sold-out status are the same either way.
- Image swatches show as image buttons in a simpler layout than the storefront grid.
Frequently Asked Questions
How is Optionfier different from Shopify's built-in variants?
Variants are predefined combinations: you write the list, the customer picks from it. That works for size and color and falls apart the moment you need text the customer types, a file they upload, a date they choose, or a color off a picker. Optionfier adds those input types and still plugs into Shopify's inventory and order system.
Is there a free plan, and what's the limit?
Yes, and it has every feature: all 23 option types, conditional logic, file uploads, Build a Box, native bundles and POS. The only limit is sales. On Free, up to $1,000 a month can go through bundles, boxes and priced options, meaning any option shown as Bundle items. A sale that includes one counts in full, main product included. Options shown as Text on order, and headings or paragraphs, never count. Pro removes the limit.
Can I use Optionfier alongside Shopify's native variants?
Yes. They sit side by side on the product page. The customer picks size through Shopify's own selector and fills in the engraving through Optionfier's field.
Do I need to modify my theme?
You add the Optionfier block to your product page template once in the theme editor (see Adding the Theme Block). It takes about a minute, and there's no code to write. To list bundle components in your cart, also switch on the Cart contents app embed.
What happens if I delete an option set?
Its configuration is gone for good and the options stop appearing on the connected product. Orders already placed keep their option data, so your history isn't touched.
How is Build a Box different from options shown as Bundle items?
An option shown as Bundle items is you deciding the structure: you define options ("Frame Material", "Color") and the customer fills each one in. Build a Box hands the structure to the customer: you define a pool of products and a box size, and they pick whatever combination they want, including multiples of the same item. Both use Shopify's native bundle expansion underneath, so inventory works the same way. If the contents never change at all, neither fits and you want a plain bundle instead. See Build a Box.
Can customers add multiples of the same item to a box?
Yes, by default. Three of the same coffee counts as three picks toward the box maximum. To cap repeats, or force one of each, use Box Rules.
Troubleshooting
Options aren't showing on my product page
Check these common causes:
- Theme block. Make sure you've added the Optionfier block to your product page template in the theme editor. See Adding the Theme Block.
- Option set status. It has to be Published, not Draft.
- Product connection. Confirm a product is connected to the option set.
- Options. You need at least one option in the option set.
Bundle components aren't showing in the cart
Most themes show only the main line in the cart, at the bundled price. Checkout always lists the components. To show them in the cart too, open the theme editor, go to App embeds and switch on Cart contents. It adds an Includes list under each Optionfier line, in the cart drawer and on the cart page.
Themes that already show bundle contents in the cart need nothing. The embed notices and stays out of the way.
Turn on Show answers the theme hides if your theme leaves out what a customer typed, like engraving text, until checkout. The answers then show in the cart too, on every Optionfier line, including ones with no components.
If the list doesn't appear, or lands in the wrong spot, fill in Cart line selector or Insert after selector. They take CSS selectors, so a theme developer can find them for you.
Cart contents is in beta. It's tested on many popular themes, but not every theme. If it misbehaves in yours, email support@optionfier.com and we'll work on support for your theme.
Inventory isn't updating
If inventory for linked variants isn't being adjusted:
- Check the link. Each option that should track inventory needs to be linked to a product variant.
- Published status. The option set has to be published for tracking to be active.
- Fulfillment. For inventory syncs, stock comes off on fulfillment, not when the order is placed.
A customer's checkout is refused and nothing on the page explains why
An option set can be hidden from customers and still track stock behind the scenes. When a hidden set's linked variant runs short, checkout blocks the whole product with a message like "Bracelet is not available in the quantity requested", and the shopper never saw the option that caused it. Open the product's option sets and look for one with Hide option from customers on whose linked variant is out of stock.
My box page says "not found"
The standalone box page only goes live when the box is Published and has a Box product connected. Check both in the box editor; the Box page surface in the Storefront layout card tells you when the page isn't live yet. Once those are set, the Open page button takes you straight there.
The box isn't showing on my product page
Three things to check:
- Theme block. The box needs the Optionfier: BYOB block added to your product page template. It's a separate block from the standard Optionfier options block. A product Optionfier created for the box uses the default product template.
- Box product. The box only renders on the page of the product connected as its box product. Make sure you're on the right product.
- Published status. The box has to be Published, not Draft.
A product is already connected to another option set
Each product can only belong to one option set. Find the option set that already has it, and either disconnect the product there or edit that option set instead of making a new one.
Can't connect a variant to a choice
If a variant won't select, it's probably stocked at a third-party fulfillment (3PL) location. Optionfier's background inventory management needs merchant-managed locations, so 3PL variants aren't supported for Text on order options or inventory syncs. Set the option to Bundle items instead: Shopify's native bundles handle third-party fulfillment correctly.
My import is blocked with a validation error
Validation surfaces problems before anything is written, each tagged with the row number in your file. See Common Conflicts for the usual causes. Most are fixed by editing the file and re-uploading.
An option set imported but appears disabled after the import
Optionfier couldn't match the option set's product handle or product ID to anything in your Shopify store, so it imported in draft to keep it off your storefront. The import history row shows a warning like "2 items reference a product we couldn't find." Open the option set, connect a product, and publish.
For Developers
Optionfier fires storefront events and exposes a small JavaScript API for themes and third-party scripts.
Events, the state snapshot shape, and every field are on the developer reference page.